Table of Contents
By following these steps below, you can efficiently manage sales to your Lutrack Inventory system, ensuring all necessary information is recorded for accurate sales tracking and management.
How to Add Sales #
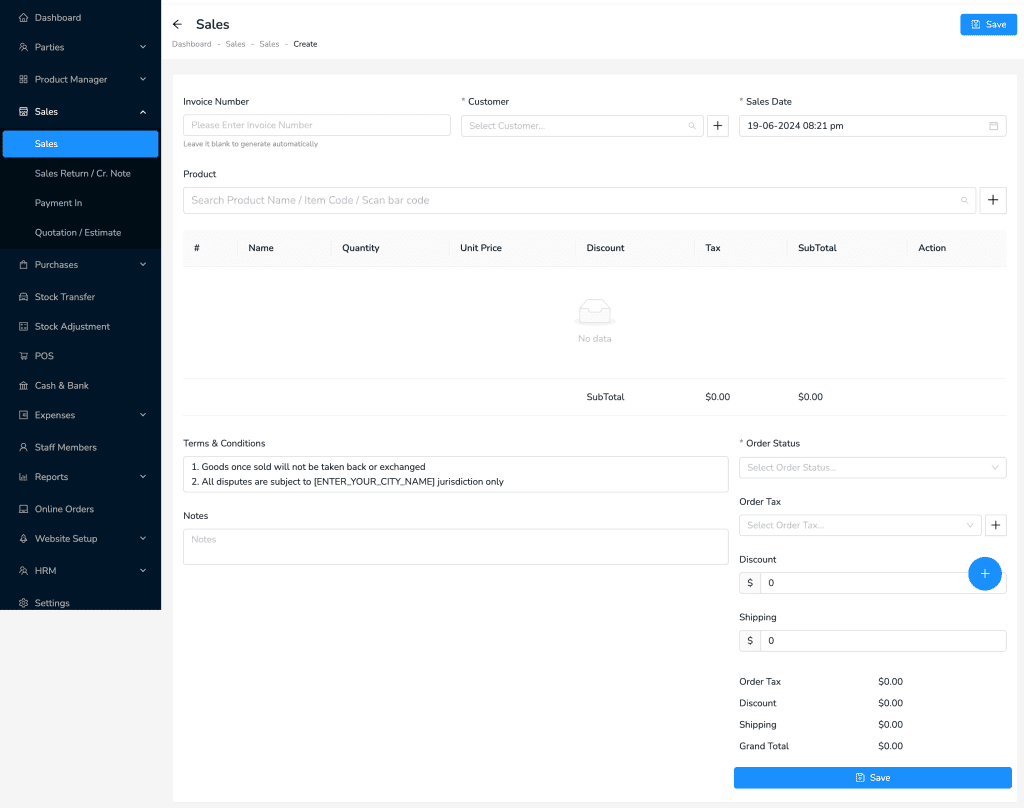
To add a new sale in Lutrack Inventory, follow these steps:
- Navigate to Sales.
- Click on Sales under the Sales section.
- Click on the + Add New Sales button to start a new sale.
- Fill in the sales details:
- Invoice Number: Enter the invoice number, or leave it blank to generate automatically.
- Customer: Select the customer from the dropdown list or add a new customer by clicking the + button.
- Sales Date: Select the date of the sale.
- Add products to the sale:
- Use the search bar to find and select the products by name, item code, or barcode.
- Enter the quantity for each product.
- The unit price, discount, tax, and subtotal will be calculated automatically.
- Enter additional details:
- Terms & Conditions: Review or modify the default terms and conditions.
- Notes: Add any additional notes for the sale.
- Order Status: Select the status of the order from the dropdown menu.
- Order Tax: Select the applicable tax for the order.
- Discount: Enter any discount amount.
- Shipping: Enter the shipping cost.
- Review the order summary:
- Check the Order Tax, Discount, Shipping, and Grand Total to ensure all details are correct.
- Save the sale:
- Click the blue Save button to finalize and save the sale.

Sales Overview #
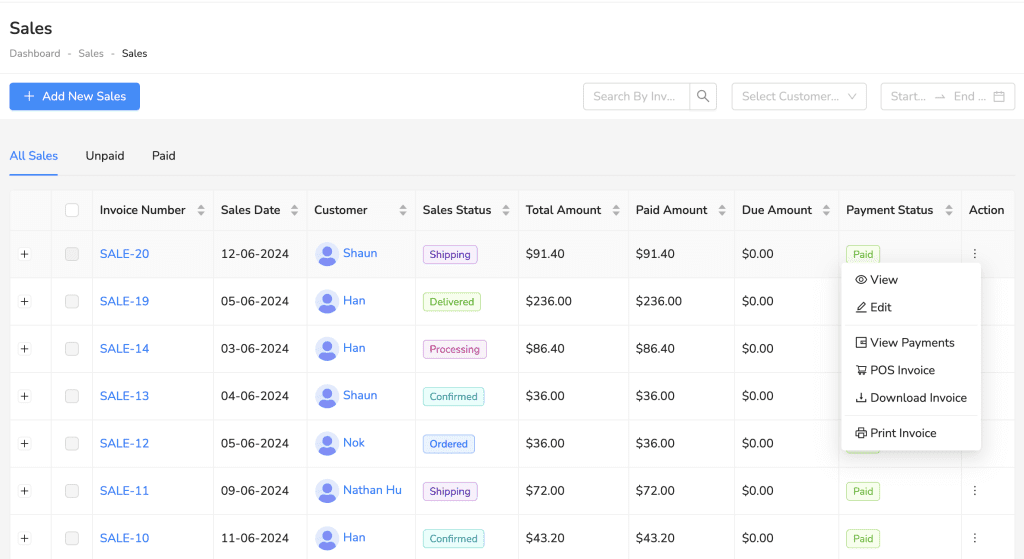
The Sales Overview panel provides a comprehensive view of all your sales transactions. Here’s how to navigate and use this panel:
- Navigate to Sales from the left sidebar.
- Click on Sales to access the Sales Overview panel.
- Overview of Sales Table:
- Invoice Number: Displays the unique invoice number for each sale.
- Sales Date: Shows the date the sale was made.
- Customer: Indicates the name of the customer associated with the sale.
- Sales Status: Displays the current status of the sale (e.g., Shipping, Delivered, Processing).
- Total Amount: Shows the total amount for each sale.
- Paid Amount: Indicates the amount that has been paid.
- Due Amount: Shows any remaining amount due.
- Payment Status: Displays the payment status (e.g., Paid, Unpaid).
- Actions for Each Sale:
- Click on the three vertical dots under the Action column to perform various actions on a sale:
- View: View detailed information about the sale.
- Edit: Edit the details of the sale.
- View Payments: See the payment history for the sale.
- POS Invoice: Generate a POS invoice for the sale.
- Download Invoice: Download a PDF copy of the invoice.
- Print Invoice: Print the invoice directly.
- Click on the three vertical dots under the Action column to perform various actions on a sale:
- Filtering and Searching Sales:
- Use the search bar at the top to search for sales by invoice number, customer name, or date range.
- Use the tabs to filter sales by their payment status: All Sales, Unpaid, or Paid.
By using the Sales Overview panel, you can easily manage and track all your sales transactions, ensuring you have up-to-date information on sales statuses, payments, and customer details.


