Table of Contents
The Purchase section allows you to efficiently track and manage all your procurement activities, ensuring accurate inventory and financial records.
How to Add a Purchase #
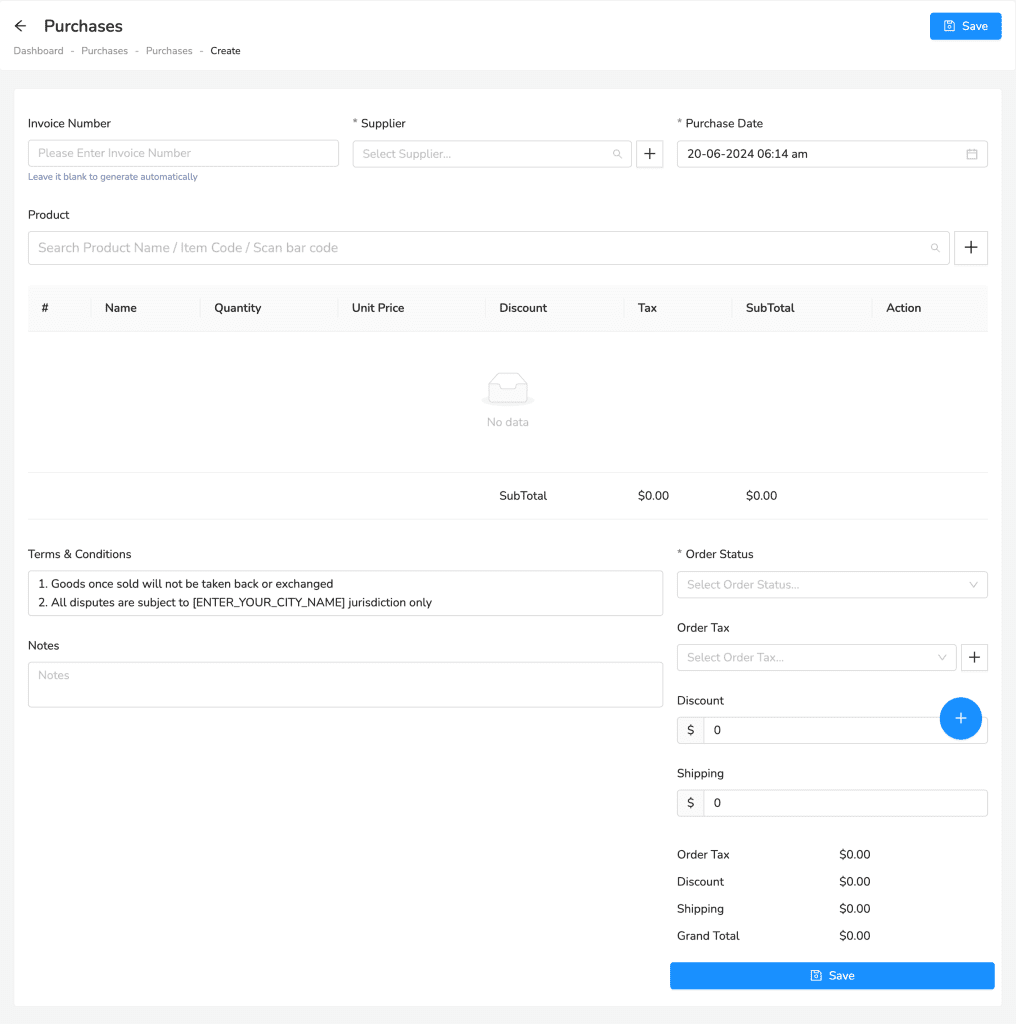
To add a new purchase in Lutrack Inventory, follow these steps:
- Navigate to Purchases from the left sidebar.
- Click on Purchases.
- Click on the Add New Purchase button.
- Fill in the purchase details:
- Invoice Number: Enter the invoice number, or leave it blank to generate automatically.
- Supplier: Select the supplier from the dropdown list or add a new supplier by clicking the + button.
- Purchase Date: Select the date of the purchase.
- Add products to the purchase:
- Use the search bar to find and select the products by name, item code, or barcode.
- Enter the quantity for each product. The unit price, discount, tax, and subtotal will be calculated automatically.
- Enter additional details:
- Terms & Conditions: Review or modify the default terms and conditions.
- Notes: Add any additional notes for the purchase.
- Order Status: Select the status of the order from the dropdown menu.
- Order Tax: Select the applicable tax for the order.
- Discount: Enter any discount amount.
- Shipping: Enter the shipping cost.
- Review the order summary:
- Check the Order Tax, Discount, Shipping, and Grand Total to ensure all details are correct.
- Save the purchase:
- Click the blue Save button to finalize and save the purchase.

Purchase Overview #
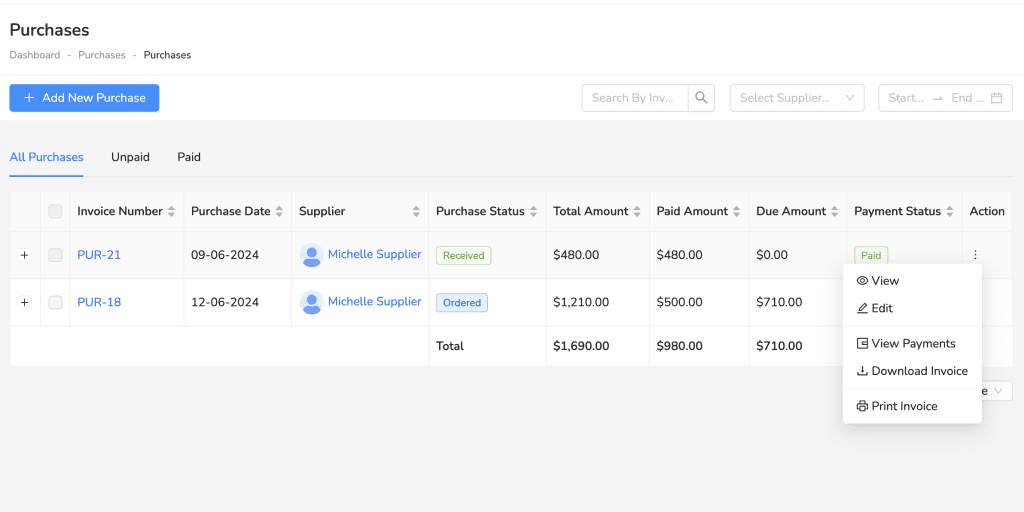
The Purchase Overview panel in Lutrack Inventory provides a comprehensive view of all your purchase transactions. Here’s how to navigate and use this panel:
- Navigate to Purchases from the left sidebar.
- Click on Purchases to access the Purchase Overview panel.
- Overview of Purchases Table:
- Invoice Number: Displays the unique invoice number for each purchase.
- Purchase Date: Shows the date the purchase was made.
- Supplier: Indicates the name of the supplier associated with the purchase.
- Purchase Status: Displays the current status of the purchase (e.g., Received, Ordered).
- Total Amount: Shows the total amount for each purchase.
- Paid Amount: Indicates the amount that has been paid.
- Due Amount: Shows any remaining amount due.
- Payment Status: Displays the payment status (e.g., Paid, Unpaid).
- Actions for Each Purchase:
- Click on the three vertical dots under the Action column to perform various actions on a purchase:
- View: View detailed information about the purchase.
- Edit: Edit the details of the purchase.
- View Payments: See the payment history for the purchase.
- Download Invoice: Download a PDF copy of the invoice.
- Print Invoice: Print the invoice directly.
- Click on the three vertical dots under the Action column to perform various actions on a purchase:
- Filtering and Searching Purchases:
- Use the search bar at the top to search for purchases by invoice number, supplier name, or date range.
- Use the tabs to filter purchases by their payment status: All Purchases, Unpaid, or Paid.


